Sunday, June 30, 2024

AECP Level 1 Final Challenge

Hey y'all! Glad you could stop by my blog today. This one is going to be a long one and I hope you will stay until the end and that you will find something new to inspire you. After completing all of my level 1 classes for Altenew Educators Certification Program, I was assigned a final challenge project and I will share my final project with you here.

The challenge rules were:

  • Create 2 coordinated sets of cards. One set for masculine and one set for feminine 
  • Create packaging for the cards to make a gift set
  • Use 3 components from the Level 1 classes and explain them
  • Use a recycled material in the sets or packaging

For my challenge cards you will see elements from the For the Guys, Clean & Simple Boutique, Easy Die Cutting Techniques, Let It Shine, Celebration Stencil Techniques, and Irresistible Inking classes. I had a hard time just choosing 3. 

I will start out with the masculine. This is the set that gave me the hardest time creating. Masculine cards are always a struggle for me. My crafting friend Tina let me borrow a couple of die sets that she had since I was lacking in the masculine stamps & dies department. For the masculine card set I chose blues, grays and silver colors, mainly because that is my husband and younger son's favorite colors.


Card 1 uses elements from the For the Guys class, Let It Shine class, and Irresistible Inking class.

For this card I pulled out my Lindy's Magical Powders for the background. I sprinkled the powders on to a piece of watercolor paper and then sprayed with water so the colors would move and blend. Once the panel was dry, I heat embossed with Altenew Whimsical Herringbone stamp and Brutus Monroe Raven embossing powder.


I die cut Simon Says Stamp Large Fancy Happy Birthday die 3 times and layered them for dimension. I stamped the wishing you from the Altenew Faceted Stars set onto a smaller strip and attached it just above the die cut words.


Card 2 uses elements from Easy Die Cutting Techniques, Celebrate Stencil Techniques, and Irresistible Ink Blending class. 

I started this card by ink blending then embossing with Altenew Bamboo Branches embossing folder and stencil set. I used Distress Oxide inks and a domed foam to do the ink blending before embossing the image for dimension and texture. Once the background was complete, I stamped and die cut the panda from Altenew Roaming Panda set and attached him to the card using foam tape.

This would be a great card for a younger boy and you could easily change up the sentiment for any occasion.


Card 3 uses elements from Easy Die Cutting Techniques and For the Guys classes.

This card started with die cutting the Simple Shapes Cover Die from 5 different colors of cardstock. I then cut down the cover die piece to make a strip instead of using the whole piece. After sticking the strip to a piece of double-sided adhesive, I then used the pieces from the other 4 colors I had cut to randomly piece in the triangle and parallelogram shapes. The double-sided adhesive makes this technique much easier to piece together.

Once the strip was pieced, I attached it to a strip of gray cardstock and using ATG tape attached the completed strip to the left side of the card front. I used Altenew Birthday Builder stamp set to create a sentiment and glued it to the card front. 


Card 4 uses elements from Celebrating Stencil Techniques and Easy Die Cutting Techniques classes.

Another card I was able to complete thanks to my crafty friend Tina. I started this card by cutting and layer the Altenew Wooden Rowboat die. While the glue dried on this layered die piece, I used the new Altenew Water Stencil and 2 different colors of ink with a large Altenew blending brush to create a watery background for my boat. You can get different looks with this stencil depending on how you rotate the stencil and how heavy or light you blend your colors.

I also die cut the Altenew Birthday Wish die sentiment twice and the backer layer once. When I started layering all of the elements it felt like the card was missing something. I cut another Simple Shapes cover die piece and then using my scissors I trimmed out the center of the die cut cardstock leaving just a frame that I attached around the edge of this card front giving it a more finished feel.


Card 5 uses elements from Let It Shine, Clean & Simple Boutique, and Easy Die Cutting Techniques.

For this card I stamped the right side of the cardstock with Altenew Illusion Diamonds using Versamark ink and then embossed the image with silver embossing powder. I trimmed the cardstock to be 4" x 5.5" and layered it on a piece of My Favorite Things Silver cardstock.

I used the same silver cardstock to die cut the Altenew Linear Crossroads die and glued it to the card front. I also die cut the Altenew Birthday Wishes die and layered it on top of the Linear Crossroads die cut. 


Now for the feminine card set. These were so much easier for me to create. Altenew has such terrific floral stamps and dies. For these cards I went with a purple and orange color scheme but also brought in a little of the blue from the masculine cards.


Card 1 uses elements from Easy Die Cutting Techniques and Let It Shine classes.

I started out by using the Altenew Circle Quilt Cover die to create a background leaving all of the pieces intact. I die cut the Altenew Craft-A-Flower Sulfur Cosmos die set from Taylored Expressions Candy Corn cardstock and then using Altenew Fresh Dye ink in Crimson and a small blending brush I ink blended the edges of the flower petals. I then glued them together and painted some Wink of Stella over the flower centers for a little shine. The leaves were cut from vellum and then I used a Copic alcohol marker on the backs for a little color. Altenew makes creating these great flower elements so easy with their keyhole and arrow system in addition to the directions in each package.

The sentiment was stamped with VersaFine Clair ink using Altenew Classic Greetings. I die cut the greeting 3 times and layered it for dimension. I prefer this technique to give dimension over using foam.  


Card 2 uses elements from Let It Shine, Easy Die Cutting Techniques, and Irresistible Ink Blending Techniques classes.


I again grab my Lindy's Magical Powders for this one. Using my Misti Stamp Positioner I stamped a piece of watercolor paper with Altenew’s In the Woodlands image using a very light ink so I could see where it was going to be then I sprinkled the powder colors where I wanted them to be concentrated and sprayed with water. I continued to add those colors until I was happy with how it looked and let it dry. 

After the panel completely dried, I brushed it well with Simon Says Stamp Anti-static powder and placed it back in the Misti then stamped it again using Versamark embossing ink and heat embossed it with Brutus Monroe Gilded embossing powder. The hello was die cut with Altenew Simply Hello die. I placed a piece of low tack tape covering half of the word and then used Versamark ink to cover the exposed half so that I could heat emboss it with more Gilded embossing powder.

The panel was die cut using Spellbinders A2 rectangle dies. Even with the sparkle in the Magical Powder the image felt a little flat so using the matching stencil I added some ink blending to the flowers and the leaves and a little around the edges of the card front for more depth. Once everything was layered on the card front, I decided to stamp the “a little note” sentiment and gold emboss it on black cardstock. 

Although I wasn't sure at first how I felt about this card, it is definitely my favorite one!


Card 3 uses elements from Celebrate Stencil Techniques, Let It Shine and Irresistible Ink Blending Techniques classes.

The background was ink with purple ink using the Altenew Sunburst Stencil. I lightly went over the whole panel with the ink left on my large Altenew blending brush to knock back the huge contrast of the white cardstock and purple ink. I trimmed the panel down again using the Spellbinders A2 rectangle die and very lightly blended some black in around the edges for added depth.

Using my Misti I stamped the large flower image from Altenew Nostalgic Florals set, then used the coordinating stencil to ink blend the image. The image was then placed back in the Misti and stamped again with the ink to crisp up the lines. Once that was completed, I die cut the image using the coordinating die.

I used Altenew Birthday Builder set to stamp the black strip using Versamark ink and Brutus Monroe Gilded embossing power to create the sentiment strip.


Card 4 uses elements from Celebrate Stencil Techniques and Easy Die Cutting Techniques classes.

Using the Altenew Circle Frame stencil I ink blended with purple and blue on to my white card base. I die cut Altenew Boho Vases die to die cut the vases and leaves from purple and green cardstock. Before adhering the dies to the card front, I placed everything in my Misti figured out where I wanted the dies to be placed and stamped the thinking of you greeting from Altenew Heartfelt Sentiments using VersaFine Clair black ink. Then I glued the larger vase and leaves to the card front and used foam dots to adhere the smaller ones for a little dimension.


Card 5 uses elements from Clean and Simple Boutique and Let It Shine classes.

I stamped the image from Altenew Paint-A-Flower Sweet Pea set on to an A2 size panel of purple cardstock using Versamark ink and silver embossing powder to emboss the image. The panel was then trimmed down to 4" x 5.5" and layered on a piece of My Favorite Things Silver cardstock then attached to the card base.

The smile was die cut from the same purple and silver cardstocks using Altenew XOXO & More die set and adhered to the card front with foam dots.


One of the challenge instructions was to use a recycled item in the cards or the packaging. I try not to keep a lot of stuff around but did find an Altenew shipping box that I had saved so decided to use that for my gift packaging.


To make the gift box I placed one of my cards on top of the piece of the shipping box to get my measurements. I then measured how tall the sides of the box needed to be by figuring out how tall the stack of 10 cards were. I added that to the measurements of the cards plus another 1/8". Once I had all my measurements, I drew them out on to the inside of the box piece. 


Unfortunately, I forgot to take a few pictures of the box making process; I promise to get better with my picture taking. Here I cut slits in the 4 corners to make flaps and then without cutting completely thru the cardboard layers, I lightly scored around all of the lines so that the cardboard would fold easily and neatly.  Here is a blog post I found to follow along with to make my box bottom - https://stickinsect.wordpress.com/2011/01/22/making-a-cardboard-box/. 

I decided I wanted a clear top for my gift box so I grabbed a piece of acetate and followed the same directions except that I cut out the corner squares completely out instead of just cutting slits so that I could fold it to make it fit inside of the box bottom. 

Once I was happy with the top and bottom, I could insert my cards, tie a pretty ribbon around it and add the for you tag.

If you made it to the bottom of this post, I greatly appreciate your time and hope you found even a little bit of inspiration to use in your card making journey. Thanks for stopping by!!

Thursday, May 23, 2024

AECP - Irresistible Inking Techniques

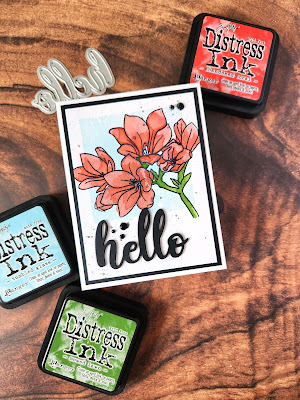
I have reached the last level 1 class Altenew Educators Certification Program. Here is my project for the Irresistible Inking Technique Irresistible Inking Technique class taught by Sara Naumann. In this class Sara gives some ideas for different inking techniques. 

For this project I used an acrylic block and inked it up with Distress Ink Tumbled Glass, then spritzed it with some water and stamped it down on a piece of watercolor paper for the background. Once that was dry I stamped and heat embossed the Altenew Blossoming Freesia stamp over top of the blue square. To color in the image I used Distress Inks that I put out on my glass mat with a little bit of water to get a watercolor look. Once the flowers were colored in I used some black ink and some gold water color to spatter over the card front.


I let this dry overnight and then attached it to a piece of black cardstock before attaching it to the card base. Using the Altenew Simply Hello die I cut out the hello 3 times using cardstock and stacked them together to get some dimension. I also used some Ranger Stickles in black and made dots, tapping the card on a hard surface to slightly flatten the glue dots out.


Supplies used:
Stamps - Altenew Blossoming Freesia
Ink - Distress Inks (Abandoned Coral, Tumbled Glass, and Mowed Lawn), Versamark
Dies - Altenew Simply Hello
Misc. - embossing powder, Distress Stickles, Yasutomo Watercolor Paint, Dr PH Martin Black Star Matte India Ink, Ranger Stickles Glitter Glue (black diamond)

Sunday, May 19, 2024

AECP - Seasonal Scene Building

In the Seasonal Scene Building class taught by Nichol Magourik, she teaches how to stretch your stamps and your creativity by creating scenes. Here is my final project for this class.


I recently ordered the Altenew Mini Delight: You're a Classic stamp & die set to use for masculine cards. After participating in the scene building class this idea came to mind. 

For this card I started out with Simon Says Stamp Holiday Horizon stencil and my blending brushes on Accent cardstock. I did not even reink my brushes just used the residual ink that was on them from previous projects. The mountains were done first and then the back rows of trees. I then stamped the car on the lower part and sketched in the road with a pencil.


This stencil works out great for scene cards because it has a choice of tree sizes. I used the larger trees for closer up on the sides of the road.  Once I was happy with the layout of the road I used my Copic markers to color in the road. 

I used the word die to cut out the word classic in Taylored Expression Black Licorice cardstock and stamped the "You are a" words with VersaFine Clair. Then layered the panel on a piece of Black Licorice cardstock.


Tuesday, May 14, 2024

AECP - Celebration Stencil Techniques

Celebration Stencil Techniques was taught by Laurel Beard. In this class she gave a number of different ideas for using all the stencils that are so popular in cardmaking right now. For my project I used the overlay technique.


I started this project by spraying my cardstock piece with Ranger Distress Ink Stains in Milled Lavender and Seedless Preserves. Once the sprays were dry I used the Altenew Color Block Triangles stencil with Distress Ink Pad in Seedless Preserves and a Ranger Domed Foam tool to do the overlay. I then used Ranger Distress Ink Pad in Black Soot to darken around the edges of the top layer.

For the floral image I embossed the image with silver embossing powder. Then I used the same 2 Ranger Distress Ink Stain sprays along with Distress Oxide Ink Spray in Mowed Lawn to color the image. Once the sprays were dried I fussy cut out the image and then using a Tiny Blending Tool I went around the edges with Black Soot Distress Ink. I used adhesive foam tape to pop up the image on the card front. 


I stamped a strip of black cardstock with hello and heat embossed it with silver embossing powder. This was glued to the card front layer so that I could trim it off before attaching the whole piece to a card front.
Supplies Used:
Stamps - Altenew Carefree Delight, Altenew Gracious Peonies
Stencil - Altenew Color Block Triangle 
Paper - Accent cardstock, Neenah cardstock, Taylored Expressions cardstock
Ink - Ranger Distress Sprays, Ranger Distress Oxide Spray, Ranger Distress Ink Pad
Misc - Unknown silver embossing powder, Versamark ink, Wagner Heat Tool

AECP - Let It Shine

The Let It Shine class is taught by Carissa Wiley. This class is all about the shiny bling we can add to our cards. For this project I did all the shiny things...lol. 


To add shine to your cards, you can use metallic paper, glitter cardstock, glitter, metallic embossing powder, sequins, pastes, and metallic paints. Some times all you need is one thing to give your card an extra little sparkle or shine. 

On this card I heat embossed the stamped image with gold embossing powder on navy blue cardstock. I then cut the image layer down and layered it on top of gold cardstock before attaching the layers to a card base. Then using Altenew glitter cardstock in gilded to die cut the hello. I also cut 3 additional hellos from navy blue cardstock and stacked them for dimension. It still felt like it needed something more so I added some sequins. Is all that too much sparkle and shine?  


Supplies Used:
Paper - Bazzill, Neenah, and Altenew Mirror and Glitter
Stamps - Altenew Magnolia Rustica
Misc. - VersaMark ink, Ranger Princess Gold embossing powder, Altenew Simply Hello die, Honey Bee Confetti Aurora Lights sequins
Tools - Gemini Junior die cutting machine, Misti stamp positioner, Wagner Heat Tool, 3M ATG tape gun

Monday, May 6, 2024

AECP - For the Guys

For the Guys class by Jennifer Rzasa is all about making masculine cards for all the men in our lives using geometrics, fun images, interactives, and even floral images. She provides tips and tricks on how to stretch your stamps and dies to make them more guy like and masculine.


Masculine cards are hard for me to make even though I have a husband and 2 sons. I struggle every time I have to sit down and make a card for any of them. I guess because I have lived in a world of testosterone and boys for so long I am general drawn more to the girly, pink, and shiny cardmaking supplies way more than guy related stuff...lol.

So for this class project I went simple clean-lined geometric and made a couple of birthday cards to add to my card stash. I used the Simple Shapes Cover die to create both of my cards. For both cards I cut the cover die in white, blue, green, kraft, peach and dark green. The card on the left uses the full cover die and the card on the right uses just the center section of the cover die to make a strip.


For both cards I randomly pieced in each of the color pieces and used liquid glue to attach them to each card front. For the left card I used the navy and green cardstock to die cut the Altenew Birthday Wish die set and layered them. I also popped the sentiment up with some foam tape.

For the second card on the right, I used my scissors and cut out the center section of the cover die before attaching it to the card front and adding the colored pieces. Then I stamped the birthday sentiment using Altenew Label Love Sentiments and Taylored Expressions Blue Corn dye ink. After it was stamp I used my paper trimmer to cut out the sentiment and popped it up using foam tape for added dimension.

SUPPLIES USED:
Stamps: Altenew Label Love Sentiments
Dies: Altenew Simple Shapes Cover die, Altenew Birthday Wishes die set
Paper:  Neenah 110lb Classic Crest, Hammermill, Taylored Expressions, Concord and 9th
Ink: Taylored Expressions Blue Corn
Misc: Bearly Art glue, Gemini Junior die cutting machine 

Sunday, April 21, 2024

AECP - Easy Ink Blending Techniques

Since I have been stamping and making cards since the mid 90s, I have tried a lot of different techniques. The faux watercolor with ink blending is one that I had not tried although I have probably seen it many times and didn't realize that is what it was. So of course for my project for the Easy Ink Blending Techniques class by Amy Lee I had to try it out.

I have had this stamp set for a while and could not figure out the best way to color it but when I saw this faux watercolor technique this stamp immediately came to mind.

Altenew Easy Ink Blending Techniques

At first when I was done I wasn't sure I liked how it turned out but once I got it mounted on a card base it started to grow on me. And while I do still need some practice on this technique and my splattering technique I think this turned out pretty well.

I followed along with Amy while doing this technique and it was very helpful to be able to stop and start the video while doing each of the step. 

Once I had the watercolor paper panel embossed with white embossing powder I then ink blended it with 4 Altenew Crisp Dye Inks.  Then using a watercolor paint brush and the same 4 colors of ink I added another layer to the image. Once that was dried using my heat tool, I then used 6 Distress Ink colors that coordinated with my Altenew ink colors to add a 3rd layer of ink to get more dimension and texture. When the final layer of ink was dry I used the purple Distress ink and gold watercolor paint to splatter the panel. 

Finally I die cut the panel using the My Favorite Things Stitched A2 Rectangle die and using some fun foam I attached the panel to a layer of dark purple cardstock and then on to my card base.

I learned that a bigger brush gives a much better look to the looseness of the "watercolor" than a smaller one I tried at first. And I am also learning that more layers of ink gives such a fun texture to my images.
 
Altenew Easy Ink Blending Techniques

SUPPLIES USED:
Stamps: Altenew Sketchy Floral and Birthday Builder
Paper: Strathmore watercolor, Bazzill and Neenah cardstock
Die: My Favorite Things A2 Stitched Rectangle
Inks: Altenew Crisp Dye Inks, Ranger Distress Inks, VersaFine Clair, 
Misc Tools: Yasutomo Pale Gold Japanese watercolor, fun foam
 

Monday, April 15, 2024

AECP - Easy Die Cutting Techniques

I really enjoyed the Easy Die Cutting Techniques class taught by Yana Smakula. For this class I chose to do a few of the techniques that Yana shared.

1. Using a cover die to emboss the background
2. Ink Blending the die cuts
3. Die cutting with vellum


SUPPLIES:
Dies: Altenew Simple Shapes Cover Die, Altenew Craft-A-Flower: Fragrant Peony Layering Die Set
Paper: Bazzill Canvas Texture and smooth cardstocks, vellum
Inks: Altenew Fresh Dye Inks
Tools: Spellbinders Platinum Six with embossing mat, liquid glue, ATG tape

I used the Simple Shapes Cover Die and the embossing mat for my die cut machine to emboss the background for this card. Then I die cut the flowers out of cardstock and the leaves from vellum using the Fragrant Peony Layering Die Set. 

After die cutting the flowers I used inks in the colors Crimson and Velvet to ink blend the flowers for additional color and depth. Altenew's keyhole system makes assembling the Craft-A-Flower dies so easy and quick.


Using liquid glue I assembled the flowers. While the flowers dried, I used ATG tape to glue the background onto a card base. Then I arranged the flowers and leaves on the card and used Press N Seal to pick up the dies to maintain the arrangement so that I could apply liquid glue to them and attach them to the card front. I then used some small adhesive foam dots under some of the flower petals to keep them raised.

Monday, April 8, 2024

AECP - Clean & Simple Boutique

My card for the Clean & Simple Boutique class taught by Jennifer Rzasa. I love clean and simple card designs and this has probably been my most used design style for the past 27 years of card making. The clean and simple lines just speak to my soul in all areas of life.


When creating a clean and simple look you want to remember that the small things can give you an extra little something. You want to think simple design with not a lot of extra layers or too much dimension. 

For this card I used a card sketch from CAS(E) this Sketch. I used sketch #305 as my jumping off point. When I saw this sketch I knew that Altenew's Paint-a-Flower: Sweet Pea stamp would be perfect.  I love using card sketches as a starting place. Some times it is nice not to have to make all of the decisions.

SUPPLIES:
Stamps: Altenew Paint-a-Flower: Sweet Peat Outline Stamp, Label Love Add-on
Cardstock: Bazzill Dark Seas, Altenew Brush Gold
Other Products: Brutus Monroe Gilded Embossing Powder, Versamark Ink and VersaFine Clair Nocturne, Yasutomo Pale Gold Japanese Watercolor

For this card I stamped the Bazzill cardstock with the Sweet Pea flower image using Versamark Embossing Ink. Then I embossed the image with Brutus Monroe Gilded embossing powder. Using the Yasutomo Watercolor paint and a small paint brush I splatter the card front. I offset the blue cardstock and gold cardstock and used ATG tape to attach the card front to a card base.

The final touch was to stamp the sentiment from Label Love Add-on with Versamark Clair Nocturne ink and used a black Copic marker along the edges to cover up the white cardstock edge. Then I attached the sentiment using foam squares.


Jen gives lots of different tips for doing clean and simple projects. If you are interested in learning more you can find the class here - Clean & Simple Boutique Cards.

Sunday, April 7, 2024

AECP - All About Layering 4

My project from the All About Layering 4 class taught by Lydia Evans. Lydia gives so many great tips in her layering classes for using layering stamps and putting them together with other products to give something extra. 

AECP, Altenew Educator Certificate Program

Supplies Used:
Cora Louise Peony Layering Stamp set
Simply Hello Die
Inks: Frosty Pink, Coral Berry, Warm Sunshine, Firefly, Grass Fields, and Shadow Creek Dye inks
Gold Embossing Powder

I started out with stamping my flowers using the Cora Louise Layering stamp set and die cutting the hello die from black cardstock. The flowers are layered on the card front using foam tape to pop some of them up and liquid glue on some to give some extra dimension. 

Then I used a couple of post-it notes to cover the Hello die at approximately the halfway point. And used Altenew Clear Embossing Ink and pressed it over the die. Once it was well coated with embossing ink I covered it with gold embossing powder and heat set it giving the die a little something extra before placing it on the card with liquid glue.

The 2 tone embossed die give this simple card a little extra shine and polish.


I have to admit that even though I have been stamping and making cards for 27 years learning to use the layering stamps was definitely a challenge for me and outside of my usual choice for designs or images. But I think it is a good thing for your creative mind to stretch yourself and try something new and different. 

Here are a few more cards I did while playing with my layering stamp sets and getting to learn how to layer and use them.
Card 1: Ornamental Flowers and Garden Hydrangea

Card 2: Vintage Flowers, Radial Circles Cover Die, and Essential Sentiments Hot Foil Plate
Card 3: Poppy Fields and Essential Sentiments Hot Foil Plate

Saturday, April 6, 2024

AECP - All about Layering 3

Here is my first project I have submitted for the Altenew Educator Certificate Program from the All About Layering 3 class taught by Lydia Evans. I have purchased a number of layering stamp sets from Altenew but had never used any of them so it was definitely pass time to do so. This class was the push I needed.


Supplies Used: Peony Bouquet stamps & dies
                Sweet Expressions Sentiment die
                Red Sunset Fresh Dye inks
                 Green Valley Fresh Dye inks
                Ocean Waves Crisp Dye ink from the Cool Summer Nights set
                Jet Black Crisp Dye ink 
                Neenah White and Stampin' Up Black cardstock 


I used the Ocean Waves to ink blend the card front and after stamping the peonies from Peony Bouquet Layering Stamp set using Altenew inks. Then the flowers were glued down with the top flower being layered on using foam tape. Using the Sweet Expressions sentiment dies I cut the thanks from Stampin' Up black cardstock.

Here are a few more cards that I made during the class using various Altenew Layering stamp sets.

Card 1: Peony Bouquet and Poppy Fields stamp sets
Card 2: Vintage Roses and Labels Love stamp sets. Playful Leaves Embossing Folder

Card 3: Watercolor Wonders and Heartfelt Sentiments stamp sets. Linear Crossroads die
Card 4: Garden Hydrangea. Hero Arts Glorious Petals stencil